🔥 Don’t Miss Out on our Blind Box Giveaway with a minimum spend of $280!🔥 Don’t Miss Out on our Blind Box Giveaway with a minimum spend of $280!🔥 Don’t Miss Out on our Blind Box Giveaway with a minimum spend of $280!
🔥 Don’t Miss Out on our Blind Box Giveaway with a minimum spend of $280!🔥 Don’t Miss Out on our Blind Box Giveaway with a minimum spend of $280!🔥 Don’t Miss Out on our Blind Box Giveaway with a minimum spend of $280!
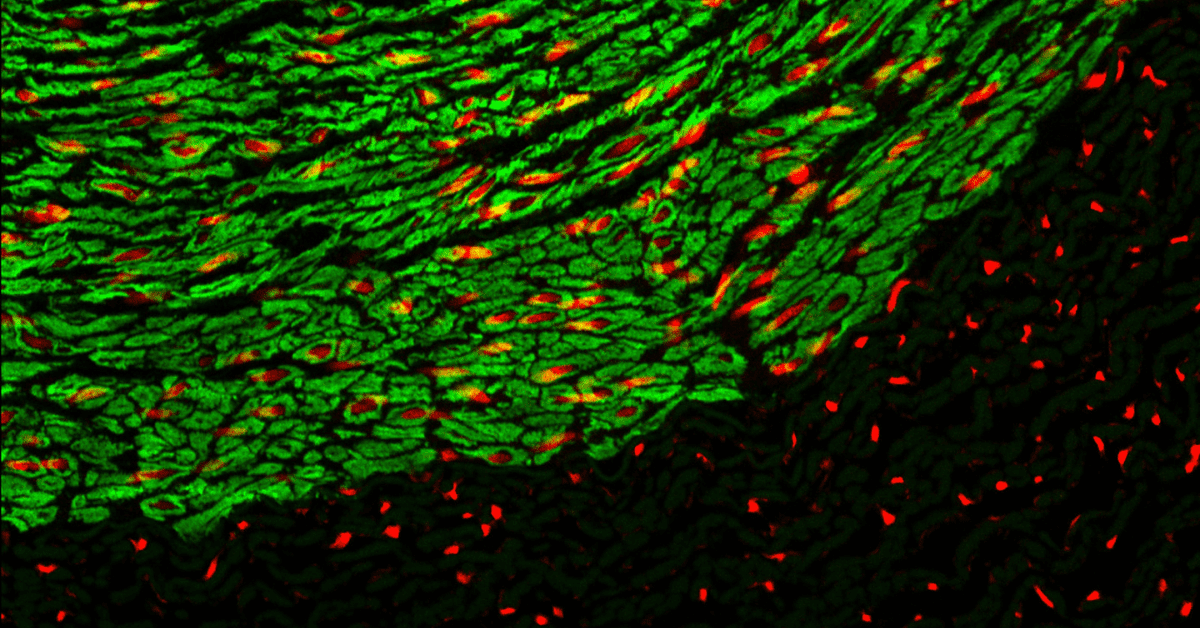
Immunofluorescence (IF) staining is a cornerstone technique in cell biology, providing researchers with the ability to visualise and study cellular structures and proteins with exceptional detail. This broad capability is achieved through combinations of specific antibodies tagged with fluorophores recognising the specific antigens in different types of tissues of various cell preparations. However, achieving optimal results in IF staining requires careful optimisation of various experimental parameters. In this blog post, we will explore key tips and best practices for achieving optimal results in immunofluorescent imaging.
1. Determine the IF Staining Fixation Methods
Fixation stands as a crucial step in IF staining, safeguarding morphology, preventing autolysis, and preserving antigenicity. The optimisation of fixatives and fixation methods, tailored to specific sample types and antigens, is imperative for achieving immobilisation without compromising antigenicity. Researchers commonly employ either chemical cross-linkers or organic solvents to fulfill these goals.
Chemical Cross-Linkers:
Chemical cross-linkers function by cross-linking cellular proteins, with paraformaldehyde (PFA) being a widely used fixative in IF staining. However, PFA can potentially compromise the antigenicity of certain targets through aldehyde crosslinking. Typically used at a concentration of 4% for 10-20 minutes at room temperature, adjusting incubation time, concentration, and temperature may be necessary for optimal antibody binding. A post-fixation wash with glycine is sometimes employed to quench PFA and halt the cross-linking reaction.
Organic Solvents:
Organic solvents, such as acetone, methanol, or ethanol, operate by dehydrating cells and denaturing and precipitating cellular components. While denaturation may expose normally buried epitopes, making it advantageous for certain antibodies, organic solvents do not preserve sample structure as effectively as cross-linkers. These solvents can be harsh, leading to the loss of lipids and soluble proteins during fixation, affecting sample structure. Consequently, they are not recommended for state-specific antibodies, such as phospho-antibodies and antibodies targeting membrane proteins. The permeabilising effect of organic solvents on lipids expedites the process, saving time during sample preparation.
Table 1: Different Fixative Methods
Fixative Types
Fixative
Effect
Pros
Cons
Chemical Cross-Linkers
Formaldehyde
Crosslinking via the free amino acids of the proteins
Preserves cellular morphology Ideal for genetically encoded fluorescent proteins
Antigen crosslinking Autofluorescence
Glutaraldehyde
Crosslinking via the free amino acids of the proteins
Preserves cellular morphology Ideal for genetically encoded fluorescent proteins
Antigen crosslinking Autofluorescence
Organic Solvents
Methanol
Precipitation of the proteins
Faster procedure Permeabilise cells
Negatively affect protein epitopes Not suitable for fluorescent proteins Loss of soluble and lipid molecules
Acetone
Precipitation of the proteins
Faster preservation Does not lose many epitopes
Not suitable for fluorescent proteins Loss of soluble and lipid molecules
2. Determining Which Detergent to Use and When to Use It
Antibodies, being large proteins, face a barrier when it comes to accessing intracellular structures due to the impermeability of lipid membranes. Permeabilisation serves as a crucial step in IF procedures by creating openings in the cell membranes, enabling antibodies to reach intracellular targets effectively. The need for a separate permeabilisation step depends on the chosen fixation method.
As mentioned earlier, in the case of organic solvents, cellular membranes become naturally permeable during fixation, eliminating the need for an additional permeabilisation step before blocking. On the other hand, samples fixed with chemical crosslinkers require supplementary treatment with a detergent for effective permeabilisation. Common detergents like Triton X-100 or NP-40 are often used, although alternatives such as saponin, Tween 20, or digitonin may also be suitable.
The choice of detergent influences the outcome, affecting the removal of specific molecules from cellular membranes and creating varying pore sizes for antibody access. Therefore, experimentation with different concentrations and incubation times is recommended. A typical starting point involves permeabilisation with 0.1% Triton X-100 in PBS for 15–20 minutes at room temperature.
Detergents aren’t restricted to the permeabilisation step alone; they are frequently incorporated into blocking, washing, and staining buffers. This multifaceted use is attributed to the detergent’s ability to enhance blocking efficiency and minimise non-specific antibody binding during subsequent washing steps.
However, if your target resides on the extracellular side of the membrane, bypassing the permeabilisation step may yield cleaner results. This approach prevents binding to any target protein still situated within the cell, enhancing specificity in your IF staining.
3. Use the Right Blocking Solution
To mitigate non-specific antibody binding and consequently minimise background signal, it is advisable to employ a blocking solution before commencing antibody incubation. Crucially, the proteins used in blocking should not originate from the same species as the primary antibody, as this could compromise the specificity of the secondary antibody towards the primary one. The most effective blocking solution often involves serum sourced from the species in which the secondary antibody was generated. For instance, when working with a secondary antibody produced in donkeys against a murine primary antibody, an ideal blocking reagent would be normal donkey serum.
In various cases, a 1-5% dilution of bovine serum albumin (BSA) proves to be a versatile protein blocker suitable for use with any secondary antibody. Maintaining the blocking agent throughout the staining protocol and incorporating it into all solutions, including antibody dilutions, ensures comprehensive and consistent reduction of non-specific binding, contributing to the overall success of the IF procedure.
4. Choose Your Antibodies and Fluorophores Wisely
The key to achieving high-quality IF staining lies in the careful selection of primary antibodies, a decision that significantly impacts the success of your experiment. Various types of primary antibodies—such as polyclonal antibodies, monoclonal antibodies, and recombinant antibodies—offer distinct characteristics.
Polyclonal Antibodies:
Comprising a heterogeneous mixture, polyclonal antibodies recognise different epitopes of a specific antigen. While they produce a robust signal, polyclonal antibodies exhibit high batch-to-batch variability, cross-reactivity, and lack specificity.
Monoclonal Antibodies:
Recognising a single epitope per antigen, monoclonal antibodies boast high specificity, low non-specific cross-reactivity, and minimal batch-to-batch variations.
Recombinant Antibodies:
Offering a long-term, secure supply with minimal batch-to-batch variation, recombinant antibodies leverage known and defined antibody-encoding sequences. This characteristic allows for engineering and manipulation to suit specific applications.
In addition to antibody selection, understanding two primary staining techniques—direct staining and indirect staining—is crucial:
Direct Staining:
In this technique, a fluorophore is directly conjugated to the primary antibody, reducing the overall immunostaining time. However, the cost of primary antibodies can be higher as each one is pre-conjugated with a fluorophore.
Indirect Staining:
Involving two steps, this method includes staining with an unlabelled primary antibody, followed by a fluorophore-conjugated secondary antibody that recognises the host species of the primary antibody. This approach allows for signal amplification, flexibility, and cost-effective alternatives in multiplexing IF experiments.
When engaging in multiplexing IF staining, careful consideration of the species origin of different primary antibodies, coupled with distinct wavelength spectra of conjugated fluorophores on secondary antibodies, is essential. Moreover, beyond spectral characteristics, the photostability of fluorophores plays a critical role. Photobleaching, induced by overexposure to light, can affect fluorescence. Choosing photostable fluorophores is imperative to ensure reliable results in microscopy.
Explore the groundbreaking CF dyes, known for their unparalleled brightness, exceptional photostability, and outstanding solubility – a fundamental solution for achieving optimal IF staining results.
Table 2: An example of a multiplex experimental setup
Target
Primary Antibody
Secondary Antibody
Colour
Common Fluorophores
Subcellular Location
DNA
DAPI
–
Blue
DAPI
Nucleus
Actin
Phalloidin
–
Green
CF 488
Cytoskeleton
Target 1
Mouse anti-A
Goat anti-mouse
Orange Red
CF 568
Any
Target 2
Rabbit anti-B
Goat anti-rabbit
Far-Red
CF 647
Any
5. Explore Variable Antibody Incubation Times and Dilutions
Following the completion of sample preparation involving fixation, permeabilisation, and blocking, the critical immunoreaction phase unfolds. During this stage, specific primary antibodies are introduced to label the desired target structures within the specimen. To optimise this process, it is advisable to pinpoint the lowest effective concentration through antibody titration, ranging from 1:50 to 1:1,000. This approach aids in determining the minimal antibody amount required while maximising the signal-to-background ratio. The antibody’s affinity plays a role in determining the incubation time, typically spanning 1–2 hours at room temperature. For those seeking enhanced results, an overnight incubation at 4 °C is a viable option.
Generally, a more extended incubation period (e.g., 4°C, overnight) with a lower antibody concentration yields a sharper, stronger, and more specific staining pattern compared to shorter incubation times with higher antibody dosages.
6. The Importance of Washing
Despite its seemingly routine nature, the washing step stands out as one of the most critical steps in the staining protocol. Achieving high-quality images with minimal background signal hinges on thorough and careful washing at each step. This becomes particularly paramount in STORM imaging, where the detection of every individual fluorophore is crucial.
Typically, PBS is employed for washing, accompanied by the addition of detergent to minimise nonspecific antibody binding. If time allows, allowing several minutes for each washing step aids in the efficient diffusion of the washing buffer throughout the specimen. Ensuring meticulous attention to the washing stage is integral to the success of the overall staining process, contributing significantly to the production of high-quality and reliable images.
7. Don’t Overlook the Importance of Controls
The absence or misuse of controls can lead to inaccurate data and false-positive results. This becomes particularly crucial when optimising a protocol, exploring different conditions, or when working with a new antibody. Including well-designed controls not only ensures the reliability of your experimental setup but also establishes trust in the acquired data.
Consider the following essential controls:
Positive Control:
Always incorporate a positive control in your IF experiments. This control is vital for determining whether any issues occurred during the staining process. Positive controls can consist of cells where the protein of interest is known to be abundantly expressed, either endogenously or through overexpression.
Autofluorescence Control:
Analyse cellular autofluorescence, especially in samples prone to autofluorescence, such as brain cells. The inclusion of a secondary antibody-only control aids in distinguishing whether observed fluorescence originates from background autofluorescence.
Antibody Non-Specific Binding Control:
Stain samples with the secondary antibody alone (without the primary antibody) to reveal if the observed signal is a result of non-specific binding of the secondary antibody within the tissue or cell sample.
Isotype Control:
Incubate the sample with a non-immune antibody of the same isotype and concentration as your primary antibody. This control ensures that any observed staining is not caused by nonspecific interactions of the primary antibody.
By diligently incorporating these controls, you not only enhance the validity of your IF data but also establish a foundation of trust in the accuracy of your experimental outcomes.
References
Im K, Mareninov S, Diaz MFP, Yong WH. An Introduction to Performing Immunofluorescence Staining. Methods Mol Biol. 2019;1897:299-311. doi: 10.1007/978-1-4939-8935-5_26. PMID: 30539454; PMCID: PMC6918834.
Jamur MC, Oliver C. Permeabilization of cell membranes. Methods Mol Biol. 2010;588:63-66. doi:10.1007/978-1-59745-324-0_9
For decades, the fight against cancer has relied on a three-pronged approach: surgery, radiation, and chemotherapy. While these treatments have saved countless lives, they often
Unveil the world of antibodies: their structure, functions, and vital role in research. Explore how these immunoglobulins revolutionize scientific discovery.
HOW CAN WE HELP YOU?Our specialists are to help you find the best product for your application. We will be happy to help you find the right product for the job.